How to Buy a Stampbook

The red phone booths dotted along the Four Rivers Bike Trail are hard to miss. Stamping is free, but you'll need to pick up a stampbook (인증수첩) for 4000원. Paper maps with some great biking trail advice are 500원 each and recommended. Click here to learn more about how the passport system works.


Completing the entire course and submitting the passport to the Korean Water Authority will net you a lovely medal and certificate that will surely bore your significant other but make you beam with pride and joy each time someone asks you about it.


Obtaining a passport/stampbook seemed daunting at first but it's actually not as hard as you might think. There's two methods:

  1. buy one in person from one of the official manned stations or 
  2. buy it online and have it delivered to your home or place of work.
Since I don't live near one of the manned stations and their times of operation didn't with my schedule, like most people, ordering online is the easier option. The website is in Korean but even if you aren't totally fluent, it's not that hard to do with a bit of help. 

  1. - Go to http://www.riverguide.go.kr
  2. - Click on 자전거 종주인증제. 
  3. - Click on 인증수첩 구매 신청.
  4. - Have a Korean speaking friend help fill out your information.
  5. - Wait 2-3 days. Pay shipping costs on delivery.
(step one)


(step two)


(step three)


What to pack when riding

There's two basic schools of thought:

ride light (and wish you had more supplies but enjoy the freedom of low weight)
or
ride prepared (and regret taking on so much weight but feel ready for any problem that comes along).

No matter how you like to ride, it seems almost everyone agrees that two water bottle cages (물통케이지) attached to the frame are essential.

Here are some additional options that are available:


Saddle Bags 
(안장백)
- less than 10000 KRW
- cheap and ubiquitous
- can carry the bare essentials (multitool, cash, patches, phone)


Smart Phone Case
(스마트폰 거치대, 가방)
- 10000 - 20000 KRW
- touch screen enabled
- can carry earphones, cash, and stamp book


Pannier / Travel Bag
(패니어, 여행가방)
- 25000 - 80000 KRW
- pack as much as you can carry
- extra rear weight changes your bike's handling but keeps you prepared for just about anything
- essential for randonneuring and long distance bike touring
 

Backpacking Bag
(자전거 배낭)
- 20000 - 100000 KRW
- keeps the weight on you instead of your bike
- can supplement a pannier


Final thoughts

I tend to pack heavy because I like to have as much on me just in case. I'm that guy. Some people would rather strap on a backpack and keep their frame light. Others use only a saddle bag, their jersey pockets, and a credit card to get by. Remember that bicycle jerseys have three pockets to store food if you don't like to ride with a commuter bag, pannier, or backpack.

Ideally, meals are purchased from proper restaurants (식당) along the trail if available or from convenient stores (편의점) if nothing else is available. Everything in between is up to you. In addition to spare parts, tubes, tools, and first aid, I always bring a piece of fresh fruit with me when I ride.

(pictured above: my snack, coffee, and tea stash for a four day ride)


Finally, as always, GCN has some good tips on the subject:


Transportation Tips for Traveling with a Bike in Korea

Honestly, there's not a lot of English-language facts regarding what you can and can't bring onto a train, bus, or subway. All I can do is try to point you in a less stressful direction.

City-to-City Buses 
(시외버스)
Inter-city bus riding is easiest option, hands down. You can quickly stow your bus underneath, ticket times are plentiful, buying tickets isn't a hassle, and prices are reasonable. Check out each city's bus schedule on their official website. Another possibility is a quick Google or Naver search for the city's name + 시외버스 + 시간표 as in 대구 시외버스 시간표 to see what Daegu's bus schedule looks like. Photos usually link to someone's personal Naver blog so the photos aren't always the most reliable but I have on more than one occasion used this method to find out when the last bus to Seoul is.

(above: easy stowage underneath inter-city buses. Photo credit: Join Chase)
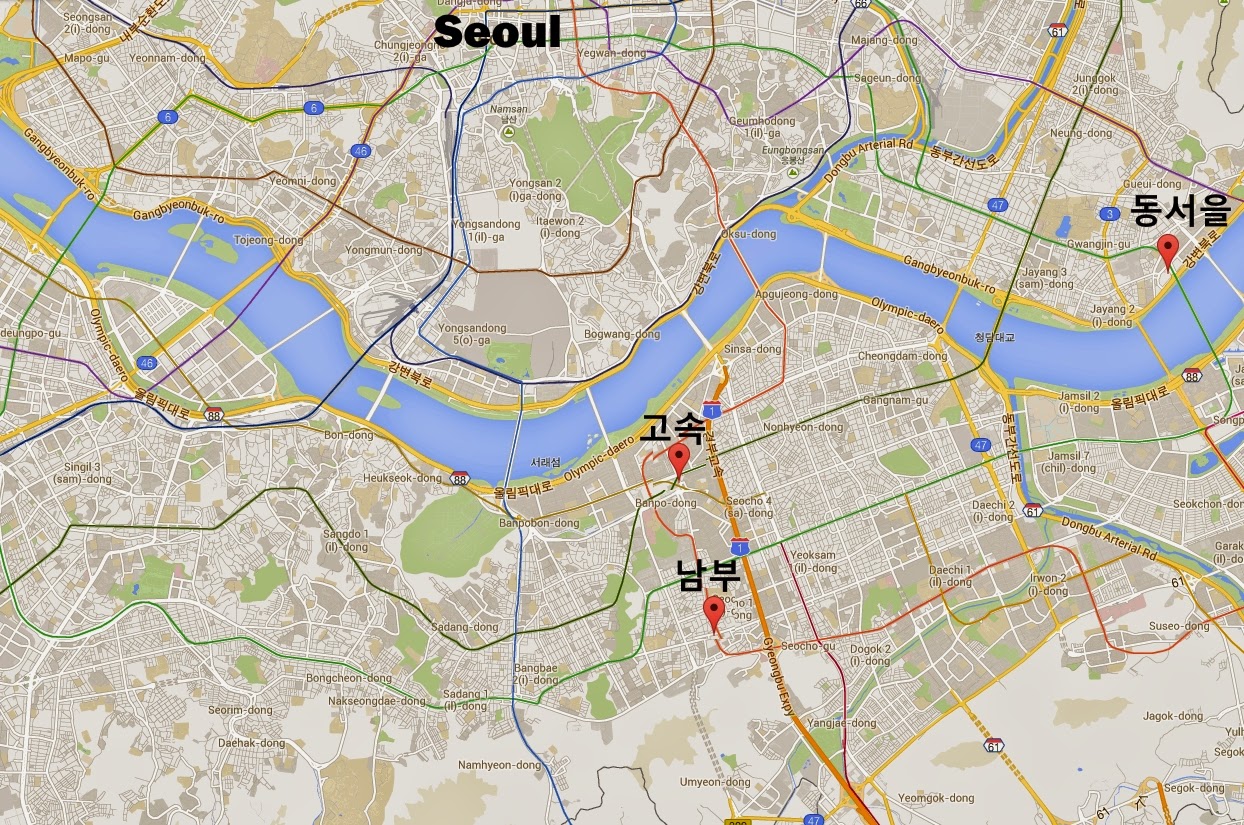
Buses in Seoul can depart and arrive from three different stations:

Express Bus Terminal 
(서울고속버스터미널)  
*also known as "Central City" (센트럴시티) and
*also known as "Gangnam Bus Terminal" (서울강남버스터미널)
My personal favorite as it's not terribly far away from where I live (only about 8km) and has more time slots available to just about anywhere outside of Seoul. Links to subway lines 3, 7, and 9.


Dong Seoul Bus Terminal 
(동서울종합터미널)  
*also known as "Gangbyeon Station" (강변역)
My backup option to use if a better time is available. Links to line 2.


Nambu Bus Terminal 
(서울남부터미널)
An older bus terminal that also has inter-city buses. Only used it once when coming back to Seoul. Links to line 3.


(above: Seoul's major inter-city bus terminals)


Regular Subway 
(지하철)
Only heading out to Bundang or Incheon and want to take a subway back home? Traveling with a bike via regular subway is possible but expect to be turned away during weekdays and busy weekday commuting times (7am-9am, 5:30pm-8:30pm). Some lines technically do not allow bikes at all, but most will allow you and your frame on the first and last car only. I've used Line 9 a number of times with the bike even though it isn't technically supported. Go figure. Take a look:
(above: which lines officially support bike use. Original Korean above and my rough translation below)


(above: which lines officially support bike use and how it has changed lately)

For more information, this OhMyNews article (Korean) is really helpful at summarizing the issue. Lots of good info there.

Expect three types of situations:

 (above: a best case scenario)

 (above: an average weekend subway ride back home in the first/last car)


 (above: bicycle subway clusterfudge)

Seoul < --- > Chuncheon
If iTX slots aren't available or you just want a sure bet coming from Chuncheon back to Seoul, subway is not a bad option. It's cheap, but it might be crowded.
 (above: expect about an hour and a half to/from Seoul (Sangbong station) to Chuncheon via subway)


Seoul < --- > Incheon 
*to be posted*


Heavy Rail / Slow Train / Bullet Train
(기차, 무궁화호, iTX, KTX)
This is also an option, but I have had hit and miss experiences with the slow trains. Keep in mind that bike riders and their bikes are not ideal passengers and trains were not designed for us in mind. We take up space and we are an inconvenience. iTX is the only exception to this as it was designed to accommodate bike riders by design, but those seats are limited.


 (above: iTX bike spots (자전거 좌석) need to be purchased ahead of time)

The less express it is, the more space you'll have and the less hassle you'll get. Bullet train KTX is probably not going to let you on. I have yet to see the fabled green train that is supposedly bike friendly). Then again, there are people who have taken their bikes, fully assembled on and off without hassle. Go figure. It seems it depends on the amount of passengers booked and the mood of the people checking tickets at the gate.

I seem to have mostly experienced the opposite side of the luck coin. I've been denied multiple times on proper trains. Once, in Chuncheon, I was turned away even after purchasing a bike ticket and waiting in queue (they refunded me the ticket price and I took the Gyeongchun subway line back to Seoul instead). Think 2 hours coming home instead of 30 minutes.

This kind of maybe-allowed-maybe-not policy is why I prefer buses instead.

 (above: KTX mid-car luggage rack being utilized by bikes instead)

What kind of bike is best to use in Korea?

There's no perfect answer because there's no perfect bike to buy. We all have different budgets and goals. Some of us commute daily while others only ride on the weekend. It's also possible that you're going to ride once during the summer and then sell the bike right back on craigslist where you bought it. No shame in that, either.

Like most things in life, you get what you pay for. Having personally started out on the cheap (<$100) and have incrementally invested more over time (<$1000), I can say that it does make a difference; how fast I go, how smooth gears shift, how comfortable I ride, and how confident I feel about my gear. However, it is possible to sink only a few hundred dollars and be able to keep up with other guys who dropped thousands of dollars on their bike.

Where to buy

Start searching with Gmarket which has low to mid-range bikes, while your local bike shop (LBS) will have much of the same plus service, part recommendations, and bike fittings. To find a shop near you, use Naver and search your neighborhood's name + 자전거점.

You might live near a boutique shop that actually carries mid to high-end models (such as Biclo, Manello, 911Bike, or BikeNara).

Another decent place, believe it or not, is Craigslist.

UK bike retailer Wiggle ships to Korea for free so long as you purchase at least 300 USD worth of products. Not a bad option for high-end gear.

Amazon is a great place to find med-range parts, too. Make sure to narrow your search to online retailers that ship internationally.

My final suggestion is to join up with the Han River Riders on Facebook. Good people, dedicated riders, and lots of great used bikes for sale.

What to buy

Below is a brief guide to understanding some of the different bike types available here in Korea and why you might be interested in one over the other. Thankfully, bicycling seems to be quite popular here, so there's a full range of choices.


Road Bike 
(로드 자전거, 도로용)
- skinny tires
- drop handlebars
- stiff, lightweight frame
- built for speed, aggressive posture
- not ideal for accessories like rear rack or mudflaps
- primarily designed for concrete road use but can be briefly used in the dirt


Mountain Bike 
(MTB, 산악용)
- wide tires
- straight handlebar
- shock-absorbing frame
- built to be comfortable even with excess weight
- primarily designed for dirt paths but can ride on roads just fine


Hybrid Bike 
(하이브리드)
- a marriage between road and mountain
- skinnier than MTB tires but wider than most road bike tires
- straight handlebar
- ideal for adding accessories
- multipurpose design (commuting, touring, road riding)
- popular choice for new riders


Miscellaneous
- Folding (폴딩), Minivelo (미니펠로), Fixed gear/fixie (픽시)


From hipster to ultra portable, these bikes are also out on the bike paths. Folding bikes seem to cater to commuters while fixies seem to be aimed at the casual crowd.


Other Considerations 

Regarding Korean-made vs. Foreign (Import) brands, consider that where you buy the bike might also determine where you service the bike. Currently, I ride a GIANT SCR2 that I picked up from BikeNara and have been happy with their service and pricing, for the most part. I used to have two different Korean-made Samchully bikes. Neither were anything to brag about but they were cheap workhorses that got the job done. Speaking of which, a note about frame types:

Steel (강철) - heavy, sturdy, cheap
Aluminium (알루미늄) - lightweight, strong, good value
Carbon (탄소 섬유) - ultralight, fast, expensive


In the end, it all depends on your needs. Currently, I like having a single all-purpose bike that gets me through weekend trips and daily commutes. I know that the correct answer is supposed to be N + 1 where "N" is the number of bikes you own. For me, though, having a commuter bag attached to a decent road bike is just enough for me.

(pictured above: Ibera pakRak Quick Release Commuter Bag 
+ Seatpost mounted rear rack)

Hotels, Love Motels, & Roughing It - Sleeping Accommodations in Korea

- Hotels / Motels / Love Motels - 

The rule of thumb is that the further you are from Seoul (or any other major city) the less likely you are to stay in a proper hotel. Then again, you're bike touring; do you really want or need a four star place to crash? Thankfully, lots of small towns (basically anything ending with "~군", "~읍", "~면" or "~리") have love motels or motels at about 40000 to 50000 a night. There are other places to stay such as saunas and hostels, but motels seem to be the most bike-friendly. There are other options out there, though. Note: *~시 or ~군 sized towns are often a better bet for accommodation choices. 

Most motels will allow you to bring your bike inside the room. If not, they usually let you chain it up inside somewhere in the building like a stairwell. Amenities usually include a warm shower, cable TV, electric outlets, an oscillating fan and clean water. Other than that, don't expect much other than some quietness away from the trail and maybe some A/C. Expect to pay about 10 bucks more on weekends and on holidays but otherwise, expect to pay 50 a night. Bunk up with friends to save money.

If you only want a place to shower up, stretch out, and grab a quick nap, look for the "대실" price at love motels. It's usually half price (20 bucks or so), but you can only stay for four hours max. Not a bad option if you still have a lot of ground to cover but need to recover first.

(above: the average love motel found along the trail near 남양주) 

(above: an older motel found along the trail near 수안보) 

(above: an average motel found along the trail near 대구) 

(above: an awesome traditional bed & breakfast for bicycle riders in 상주. 
Amazing location, super friendly owners, delicious food, and a quit night's sleep.)


- Camping / Roughing It / 쉼터 / 정자

Before I get into proper camping, let me throw this one out there: there are rest areas (쉽터) and pavilions (정자) all along the trails. They are free and public. They're great to hop off the bike, stretch, hydrate, meet up with your group, or even sleep for an hour or so. Nothing better than closing your eyes while feeling a cool summer breeze under one of these beautiful gazebos before heading back out on the bike. 

(above: pavilion / gazebo rest area right along the bike trail) 

(above: a quick rest stop with a nice view. 
Not pictured: a free public air pump for all tube types) 

(above: a quiet rest area for riders) 

 (above: an early morning rest stop on the trail near a private family farm) 

(above: not much protection from the sun but better than nothing) 

 (above: a gorgeous rest stop near a Buddhist temple) 


If you're really on a budget or simply prefer the romantic idea of sleeping under the stars, rest assured that there are designated camping sites available. Yeoju (여주) comes to mind. Here's the official website for bike camping sites. (Here's the slimmed-down English version).


  (above: free camping in Yeoju) 

  (above: free showers and clean water in Yeoju) 

Make sure to bring a sleeping bag, tent, and clothes along. Gmarket actually has decent prices for panniers and travel bags


Strava

Braggadocios web/phone app for bicycle riders. Strava is a great way to motivate yourself and your buddies. Join challenges, map your ride, meet other riders, give kudos, and try for the King (or Queen) of the Mountain award for local bike trails. This has been an integral part of motivating myself to ride. When I see my friends log in time on their bikes, it gives me a positive push to get back on. Plus, those monthly Gran Fondo challenges are really enticing.


  1. your smartphone/iPhone or a GPS device for your bike
  2. Strava app (free)
  3. Strava.com access (free)


I actually use both my smartphone (for short commutes) and a GPS (touring and day rides). The arguably most popular brand is the Garmin Edge series. I have a barebones model that I like really like. Minimal display, $120 price tag, and a 14 hour battery life.

Compared to MapMyRide, Strava has more active riders, groups, and free features that I like. Plus, it seems to work a lot better here in Korea. Feel free to follow me to see just how out of shape I really am.


Off the Beaten Path - Korean Countryside Bike Trip Ideas


The Han River trail is great. The Seoul to Busan trail is amazing. The Four Rivers Trail is breathtaking. So, what do you do when you've done all of those? Maybe you're just looking for a nice day trip outside of Seoul. There's a bunch of country trails that are worth checking out. Here is a list that I am currently using to plan future countryside trips:

(above: Chilseon Valley (칠선계곡) near Jirisan National Park (지리산국립공원))  


(above: Wonju Rail Park (간현원주레일파크). Photo credit: Life Outside of Texas)